The Complete Guide To Audio Cleanup For Free
Welcome to our second official guide to podcasting! Today we’ll be going through all the ways to clean up audio (for free!) using Reaper plugins. If you missed out on the first guide, our Complete Guide to Podcast Editing, I suggest you take a look through it, because we’ll be building off some of the concepts introduced there.
This guide will show you 4 techniques for reducing noise and giving your listeners a better experience. They are:
Removing background noise
Restoring off mic vocals
Reducing plosives
Reducing noisy events
Note: This guide requires Reaper 5.50, which came out in mid-September, and the SWS extension.
Removing Background Noise
The first step to getting our audio tracks clean is to reduce the amount of background noise. By “background” noise, I mean the noise that is always present in your room. It’s consistent, fairly unwavering and is present throughout the entirety of the track. Common examples are computer fans, AC hums and radiators.
Obviously, the best advice is to try to curtail these problems before you turn on the mics, but unless you’re recording in a studio, every one of your voice tracks will have some amount of background noise in it. So instead of building a custom studio, we’ll use ReaFir to reduce some of this noise.
ReaFir is an incredibly powerful EQ and dynamics processor that uses FFT spectrum analysis. Think of it as an EQ or multiband compressor with a near infinite amount of bands. This allows us to make very minute edits, and I’ve got some plans for some interesting guides in the future. But for now, let’s start reducing the noise in our track.
For this tutorial, I’m going to work with a few pre-recorded audio bits so you can more easily hear the before and after. So we’re starting off with a track that was recorded with an AKG Perception 100 (my very first mic!), with the noise of an air conditioner clearly audible in the background.
We can hear some an unacceptable level of fan noise. So lets go to FX > Cockos > ReaFir (FFT EQ +Dynamics Processor), and add it to our track.
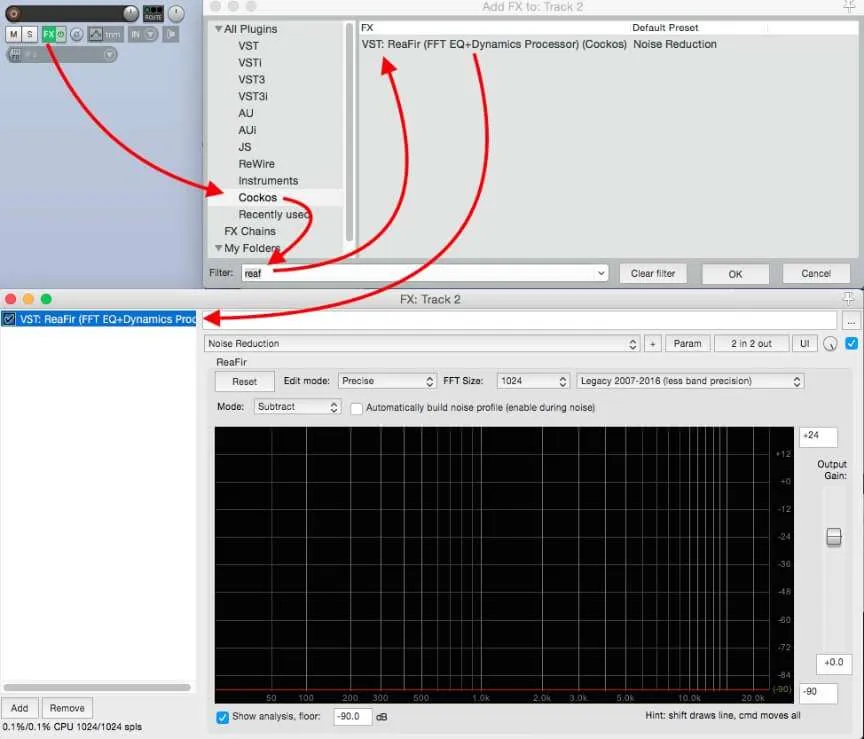
In the interface for ReaFir, click on the menu next to Edit Mode and choose Precise, FFT Size to 1024 and then underneath change Mode to Subtract. When you select this, you should see an option appear marked Automatically build noise profile (enable during noise), click it. We’ve now primed ReaFir to to listen to the noise in our track, which we’ll select in a second. While Automatically build noise profile (enable during noise) is selected, make sure you only let Reafir listen to static noise, otherwise it will start to incorporate your voice into the noise profile, and try to eliminate it from the track.
Now, find a piece of your audio where there is only background noise. Make sure no one is talking, there isn’t a sniff or cough, stifled yawn or beer can opening. Right click to highlight this section of audio and click the Repeat button next to the red Record button at the top of the page. Set your play cursor somewhere within the time selection and hit play.
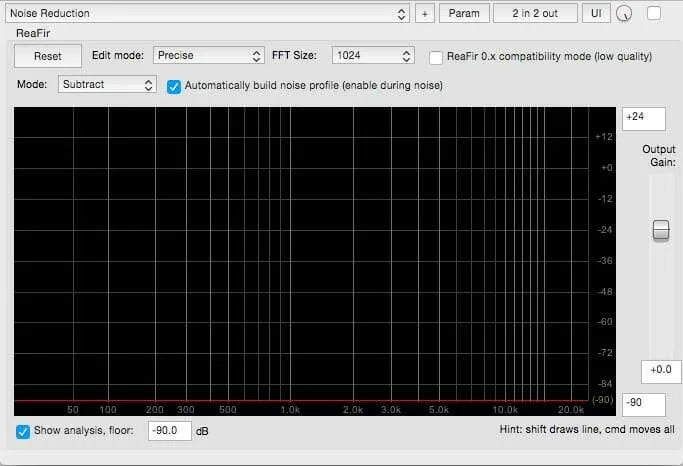
You’ll notice the red line in the GUI of ReaFir start adapting to the noise. Let the audio loop until the red line has just about settled down and then deselect Automatically build noise profile (enable during noise) in ReaFir.
However, you’ll also notice that there are some artifacts in our audio that weren’t there before. The noise is gone, but the voice doesn’t sound natural. To correct this, CMD + Click (Ctrl + Click on Windows) the red line and start to drag it down. You’ll see the line retains the shape of the noise profile, but dragging it up and down will adjust the amount of effect it has on the audio. Pull it down until the voice sounds normal again, even if some noise is slipping through. Like many aspects of audio editing, the trick to getting the best denoising results is to use a few instances of ReaFir each taking off some noise rather than one instance trying to remove it all.
Add a second instance of Reafir and make sure it comes after the first one we set up. Repeat the process of creating the noise profile for this second ReaFir, but this time it is only working on eliminating the noise the first one is letting through. Once again, listen to the resulting audio and pull down the second ReaFir’s noise curve until it is not adding any artifacts to the voice. While often 2 passes of ReaFir will bring the noise level down to an acceptable level, don’t be afraid to use 3 or even 4 passes if you’re going for a really pristine sound. However, I’ve found that after 4 instances of ReaFir you’re probably doing more harm than good to the signal, but in the case of our AC addled example a third pass was warranted.
Note: Multiple instances of ReaFir across multiple tracks can get a little CPU taxing, so you may want to render out the audio by selecting all the tracks (not the audio, the track parameters itself on the left hand side) and right clicking to select Render/Freeze Tracks > Render tracks to mono stem tracks (and mute originals). This will free up processing power for other effects down the line.
Restoring Off-Mic Vocals
Next let’s look at a less conventional way of using ReaFir for when people are sharing mics, or someone has said something off mic that we would like to use in the podcast. This method is something I’ve used only when the audio for an interview is so bad, that it is borderline unintelligible. In these cases, I take the track as far as I can using ReaFir, using up to 4 instances on the track, and then create a duplicate of the track, and denoise that one further, with the sole intention of getting out all the noise. This will make the secondary track sound like garbage on its own, but not to worry. We then adjust the level of the heavily denoised track until it is accentuating the voice main track, but not so high that we can make out that there are two separate tracks. Doing this can add the little bit of clarity that can help save a botched recording session, although be warned the results will be far from perfect.
Reducing Plosives
We’ve talked about plosives before, but just a quick recap: plosives are the ‘puh’, ‘buh’, ‘tuh’ and generally any vocal sounds that have a large amount of air expelled, that is then translated into a lot of low end energy by our microphones. Most plosives can be mitigated by using a pop filter/wind screen, but eventually you’ll have to deal with one while you’re editing. Luckily, we can automate the process in Reaper so dealing with them only takes 1 button press.
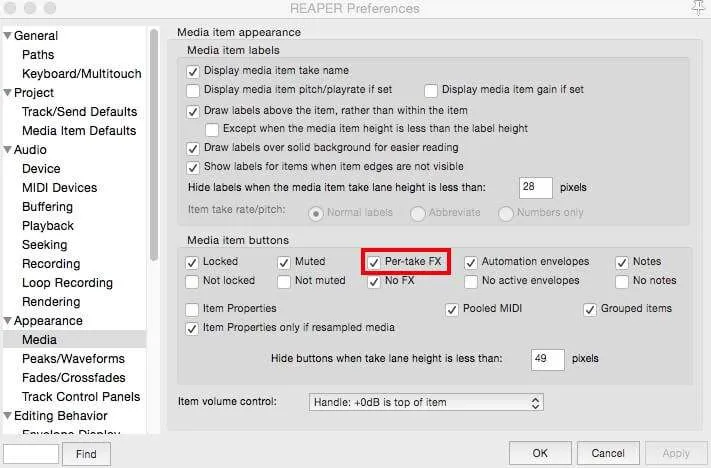
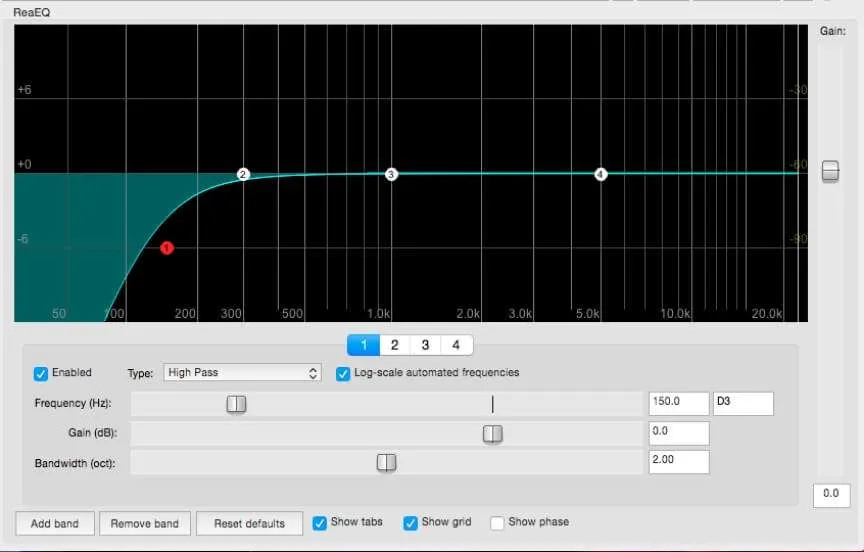
First, go to Preferences > Appearance > Media and make sure Per-take FX is checked. This will let us apply FX to only certain parts of a track, which is useful for plosives, because we’re going to apply an EQ curve to just the “puh” sound that would not sound good applied to the whole track.
Next, open up a blank track and open the FX tab. Load up an instance of ReaEQ and reset the EQ to factory defaults, and then set the Type of band one to High Pass, the Frequency to 150 Hz, and the Bandwidth (oct) to 2.00. Next, right click on the listing VST: ReaEQ (Cockos), and click on FX Chains > Save Selected FX as Chain. This part is particularly important: Save the FX chain with a name starting with ‘01’ and then a space. Reaper looks at FX chains alphabetically, so we need this one to always come up first.
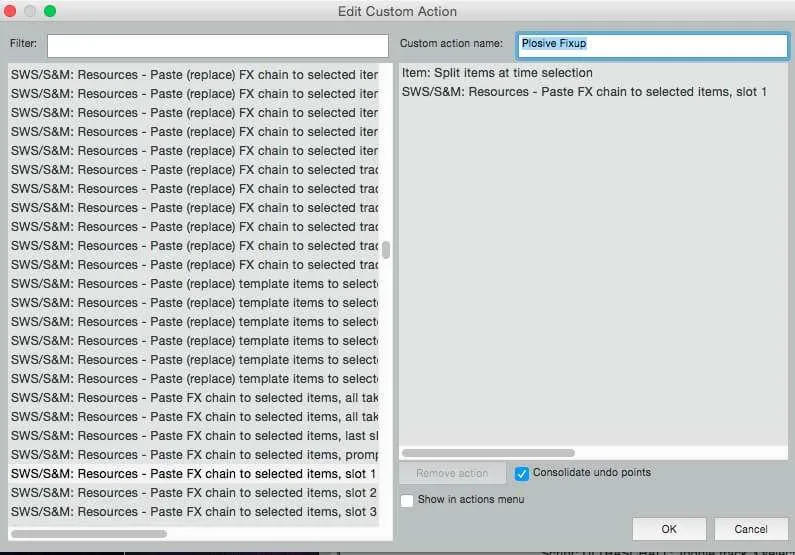
Finally, go to Actions > Show Action List…, and then click New next to Custom Actions. A new screen will pop up. Give the custom action a name (‘Plosive Fixup’ comes to mind), and then add the actions Item: Split items at time selection and SWS/S&M: Resources – Paste FX chain to selected items, slot 1. Click OK, and then back on the action list screen give the action a short cut. If you’re also using our Complete Guide to Podcast Editing, I suggest ‘D’, as it will keep it close to the other actions we have set up for editing.
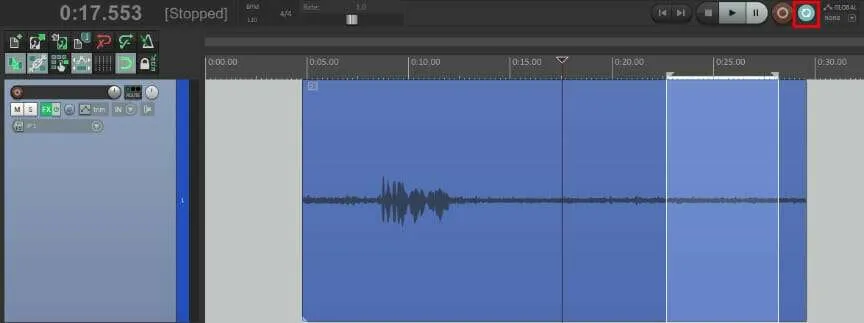
From here, it’s just a matter of highlighting the plosives (really make sure you zoom in and only select the “puh” sound), and pressing D. This will add our de-plosive EQ to just that section, leaving the rest of our audio untouched and making our listeners very happy.