Creating a Project in Reaper (Podcast Editing Guide Part 2)
With Reaper installed and configured, you’re likely chomping at the bit to dive into the editing process. Just for a few minutes, though, let’s hold those proverbial horses and set ourselves up for repeatable success, which we can do by assembling a standard track template that will be the first thing you add to any new project, understanding how to add audio files to Reaper’s editing pane, and configuring the project saving settings to ensure that you’re not taking up precious hard drive space with files you don’t actually need.
In order, this standard operating procedure covers:
1.1 Creating Tracks and Adding Plugins
1.2 Creating a standard AMM track template for easy mixing
1.3 Saving track templates for quick and easy project setup
1.4 Synchronizing tracks
1.5 Saving a project file
In order, this standard operating procedure covers:
1.1 Creating Tracks and Adding Plugins
1.2 Creating a standard AMM track template for easy mixing
1.3 Saving track templates for quick and easy project setup
1.4 Synchronizing tracks
1.5 Saving a project file
1.1 Creating Tracks in Reaper and Adding Plugins
Before we add any audio items to Reaper and start editing to our hearts’ content, it’s important to know the basics of creating tracks and adding plugins to said tracks to suit our purposes, especially with the upcoming section.
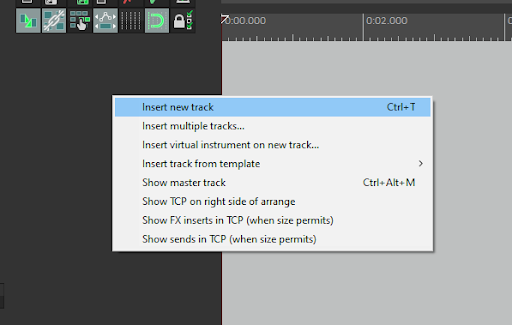
Right-click on the dark grey bar to the left of the editing pane and select the first option, “Insert new track”. Per the attached screenshot, you can also use the keyboard shortcut Ctrl+T.
Right-click on the dark grey bar to the left of the editing pane and select the first option, “Insert new track”. Per the attached screenshot, you can also use the keyboard shortcut Ctrl+T.
By default, the red circle in the upper left-hand corner of the track settings panel will be lit up. This signifies that the track is “armed” and ready to record, but since we aren’t doing any recording in our case you can simply click the button to disarm it.
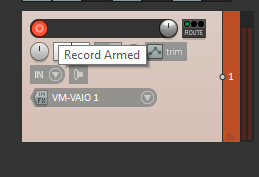
Immediately to the right of that button is a blank text field, which you can click on and type in a track name of your choice. Adding an audio item to a blank track will automatically populate the field with its filename, but given how long and/or not particularly straightforward some of those names can be, we recommend typing one that’s easy to recognize. In the vast majority of cases, the speaker’s first name will suit your purposes.

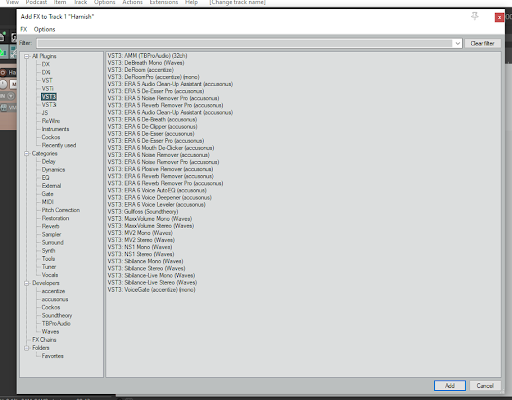
You will see a button labeled “FX” right underneath the track name field, greyed-out by default. By clicking this button you’ll be greeted with an extensive list of all of the audio plugins available to you. Enlarge the window to see the full list. On the left hand side is a series of categories allowing you to view plugins by interface type (we mainly use VST and VST3 for our purposes), effect categories (such as equalizers and compressors) and developer name. In the main window is a list of those plugins based on the selected category. You can also search for specific plugins via the “Filter” text field at the top.
To add FX, click once on the plugin of your choice and select “Add” in the lower bottom-right corner, or simply double-click it. If you’ve already added an audio item to this track, the plugin will appear in its track tab at the bottom of Reaper. If no audio items have yet been added to the track, Reaper will automatically create the tab for you.
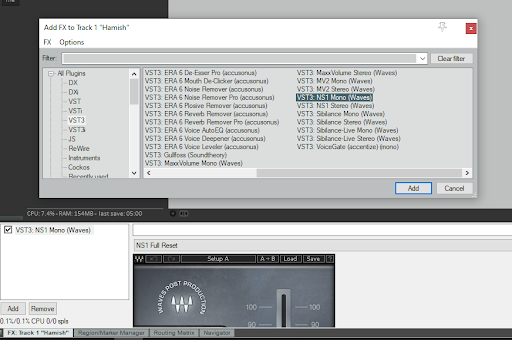
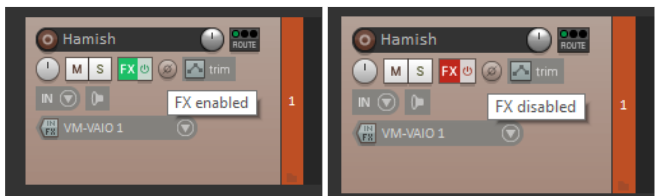
You can continue to add plugins using the “Add” button in the track tab. Should you need to turn off an individual plugin, untick the checkbox next to it in the tab. If you’d like to disable all plugins on a track in one go, click the power button icon attached to the FX button in the track settings panel. Once the button has turned from green to red, you’ll know all FX on that track have been bypassed. Clicking it again will change the button back to green and re-enable all attached plugins.
Play around in this space at your own leisure to get the hang of inserting tracks, adding FX and switching between tabs. This will acclimate you to our next, very important step: assembling a track template that you’ll use with every podcasting project.
1.2 Creating an AMM Track Template
Essential to any podcast featuring more than one speaker is ensuring that all spoken tracks, from the interview to the intro and outro voiceovers, are properly balanced. This is especially important when you have a remotely recorded interview with multiple speakers who are prone to talking over one another, since you risk one person drowning out the others. As we lack actual physical mixing boards for this purpose, Podigy has found a handy solution in TBProAudio’s AMM plugin, an automixer VST capable of balancing 32(!) channels at once.
This section is quite technical, since it involves adding several plugins and routing three tracks into a fourth, but don’t worry, we’ll walk you through every step. The Plugin Resources SOP will set you up with every FX you need for this purpose and most others.
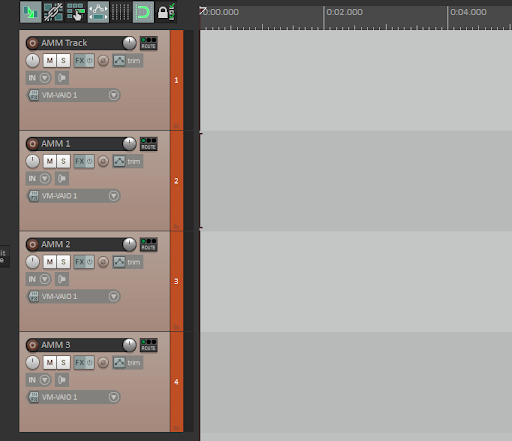
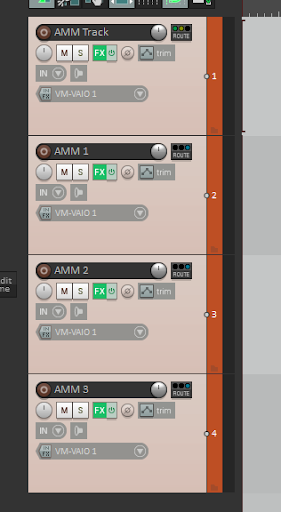
Create four tracks and name them in order: “AMM Track”, “AMM 1”, “AMM 2” and “AMM 3”. Use the Tab key on your keyboard to quickly shift between the track name text fields for each one.
This section is quite technical, since it involves adding several plugins and routing three tracks into a fourth, but don’t worry, we’ll walk you through every step. The Plugin Resources SOP will set you up with every FX you need for this purpose and most others.
Create four tracks and name them in order: “AMM Track”, “AMM 1”, “AMM 2” and “AMM 3”. Use the Tab key on your keyboard to quickly shift between the track name text fields for each one.
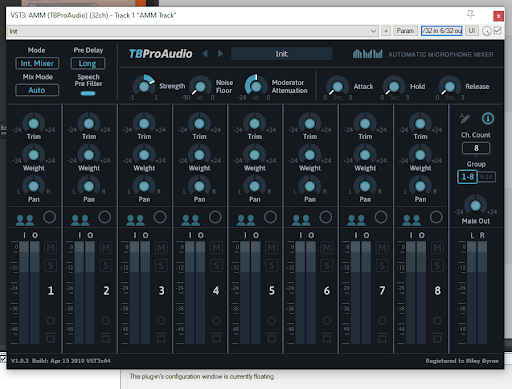
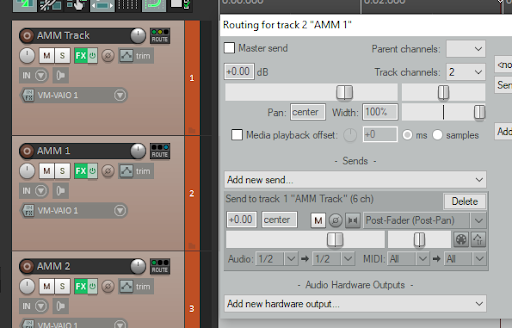
Open the FX panel for “AMM Track” and add AMM (TBProAudio)(32ch), which can be found under the VST3, Tools or TBProAudio categories in the left navigation panel. From there, match the settings on your instance of AMM to what you see in the screenshot below. The exact setting for the “Strength” dial is 0.5.
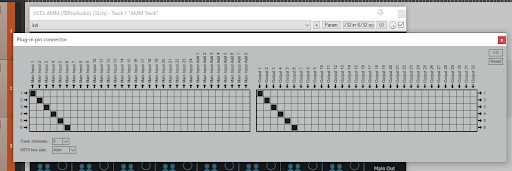
We also need to bump up the number of AMM’s channels to 6, which we can do by clicking the plug-in pin connector button on the AMM’s top toolbar to the immediate right of “Param”. You’re going to see a very complicated array of inputs and outputs, but fret not! Simply click on the “Track channels” drop-down menu at the bottom of the window and select 6.
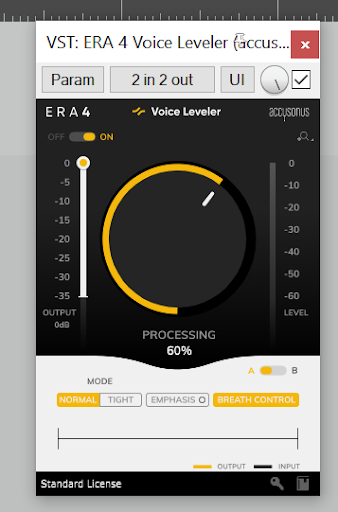
Next, add the plugin ERA 4 Voice Leveler (accusonus), found under the VST, Restoration or accusonus categories. Voice Leveler, as its name implies, aids in leveling out the volume on a track. In addition, its Breath Control function reduces the loudness and harshness of breaths, a feature both editors and listeners will appreciate. Match its settings to what you see in the screenshot below.
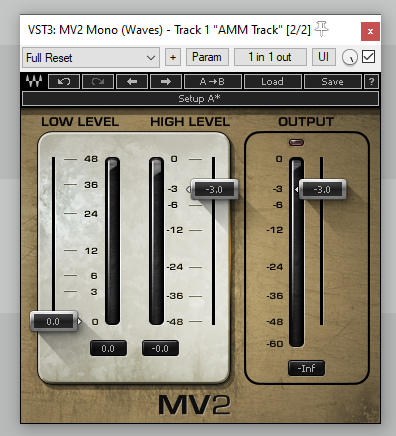
Following Voice Leveler is a compressor called MV2 Mono (Waves). Found in the categories VST3, Dynamics and Waves, it moderates volume levels as well, closing the gap between the higher and lower dynamics in a given track so that its audio profile is more consistent. Match its settings to what you see below.
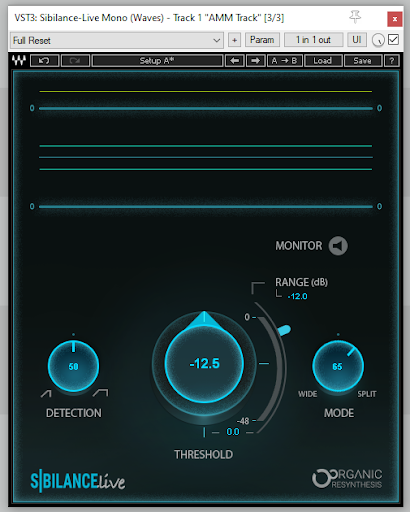
The last plugin to be added to the FX chain on “AMM Track” is Sibilance-Live Mono (Waves), found under the VST3, Dynamics and Waves categories. This attenuates (lessens) the harshness of those hissy ess-sounds—such as in the word ‘sibilance’ itself—that can be very noticeable if left as is. The only setting you actually need to adjust in this case is dialing “Mode” to 65, per the screenshot below. Once that’s completed, we’ve taken care of every plugin on the main template track.
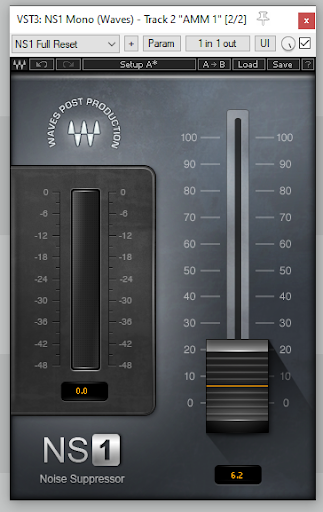
With the main track configured, let’s move on to “AMM 1” immediately below it.
Add NS1 Mono (Waves) from VST3, Restoration or Waves. This is anoise reducer, and if you’re wondering why we have two on the same track, it’s because each manages to isolate frequencies that the other doesn’t, so we found they work best in conjunction with each other. We don’t want it cranked up too high, so leave it around 6-7%.
Add NS1 Mono (Waves) from VST3, Restoration or Waves. This is anoise reducer, and if you’re wondering why we have two on the same track, it’s because each manages to isolate frequencies that the other doesn’t, so we found they work best in conjunction with each other. We don’t want it cranked up too high, so leave it around 6-7%.
It’s time to route AMM 1 into the main AMM Track, for reasons we’ll explain shortly. Click the “Route” button to the right of the track name field. In the window that pops up, untick the checkbox next to “Master send,” and then click on the “Add new send” drop-down menu to select “1. AMM Track”. Ensure that the “Audio” inputs to the left of "MIDI" are set to 1/2 -> 1/2, then click out.
We’re now going to repeat step b) with “AMM 2” and “AMM 3”, including the same two noise reduction plugins with most of the same routing settings. But rather than leave the routing audio inputs on their default of 1/2 -> 1/2, we’re going to change the latter inputs to 3/4 for AMM 2 and 5/6 for AMM3. So the inputs for each track under “AMM Track” should read as follows:
AMM 1 = 1/2 -> 1/2
AMM 2 = 1/2 -> 3/4
AMM 3 = 1/2-> 5/6
At this point, having followed each step with a painstaking eye for detail, you’re likely wondering “Why are we doing all this routing?” What we’ve done is smartly routed the numbered tracks into “AMM Track”, the template’s “Master send.” This way, the four FX plugins on the main track are now applied to the three numbered tracks without having to replicate each one and its settings multiple times over, and no matter how many tracks are routed into “AMM Track”, they’ll all be automatically and properly mixed! In addition, it also means we can apply other plugins to a numbered AMM track without them affecting its companions, which is very useful when one speaker has audio issues the others do not.
For every podcast you work on, you’ll be dropping all voiceover-only audio items onto one of the numbered AMM tracks, rather than “AMM Track” itself. Any musical audio items like intro/outro cues or music cues with voiceover already “baked in” should go on their own, non-AMM tracks that you can quickly create with Ctrl+T, otherwise they’ll be affected by AMM’s processing and sound very off.
If you ever have three or more speakers and not enough AMM tracks to go around, create a new track using Ctrl+T and repeat steps b) and c), but make sure to iterate the input in the routing panel. So “AMM 4” should be set to 1/2 -> 7/8, “AMM 5” should be set to 1/2 -> 9/10, etc.
1.3 Saving Track Templates
Before we do anything else, it’s imperative that we save this setup as a track template, so that the moment you begin a project in the future you can simply summon it with just a couple of clicks and without any need to redo this entire complicated process step by step.
Highlight all four tracks by double-clicking on “AMM Track”, holding down the Shift key, and then double-clicking “AMM 3”. Each highlighted track will have a tiny white dot on the right edge of their settings panel.
Highlight all four tracks by double-clicking on “AMM Track”, holding down the Shift key, and then double-clicking “AMM 3”. Each highlighted track will have a tiny white dot on the right edge of their settings panel.
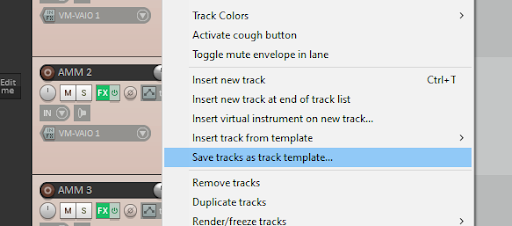
Right-click on one of the tracks and select “Save tracks as track template…”
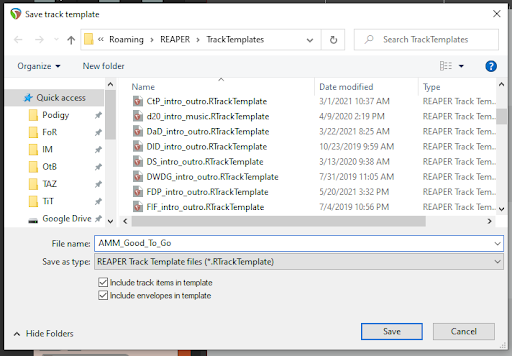
Choose “AMM_Good_To_Go” or another easy-to-remember name for the template, make sure both “Include track items in template” and “Include envelopes in template” are checked, and hit “Save.”
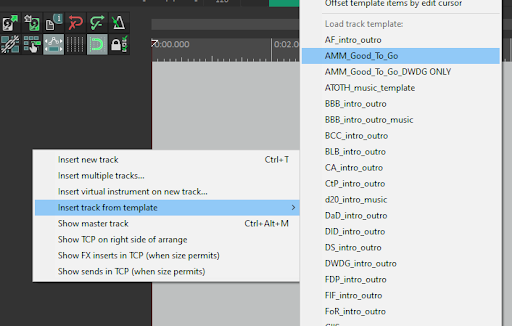
Now, if you ever want to import the AMM template or any other template, right-click on the grey panel next to the editing pane, hover over “Insert track from template”, and select “AMM_Good_To_Go” from the list. Voila! AMM tracks at the drop of a digital hat.
By highlighting the appropriate tracks and saving as a track template, you can easily pull up standard components for any given show—music cues, intro/outro voiceover, ad break music beds—without having to manually arrange them or copy and paste them from an existing project. This will be an indispensable tool when you’re eventually working on multiple shows from week to week.
1.4 Synchronizing Tracks
In the majority of cases, the tracks we receive from clients are pre-synchronized, which means they’re all the same length and there’s no additional adjustment needed to get everybody speaking when they’re supposed to be. Every so often, though, remote recording latency and unexpected interruptions means trial, error, and the occasional bit of audio surgery are required to get everything nicely synced up.
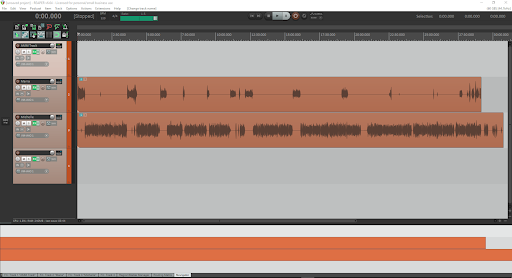
Here is a show that is unique in that both host tracks start off synchronized and gradually become more and more desynchronized as the show progresses due to latency. In the screenshot below, you‘ll notice the substantial desync in both the editing pane and the navigator window.
Here is a show that is unique in that both host tracks start off synchronized and gradually become more and more desynchronized as the show progresses due to latency. In the screenshot below, you‘ll notice the substantial desync in both the editing pane and the navigator window.
There’s unfortunately no one-and-done solution for this kind of desynchronization, so before we can commence with our actual edit we have to go through the audio from left to right, break up the upper, shorter track into smaller pieces, and resynchronize them with the lower, longer track. Our best tool for this job is the “Item: Split items at edit cursor (no change selection)” action, which should be assigned the default keyboard shortcut S. This action splits a highlighted audio item wherever the editing playback cursor is placed, allowing us to restore the original conversation with a little bit of time and patience.
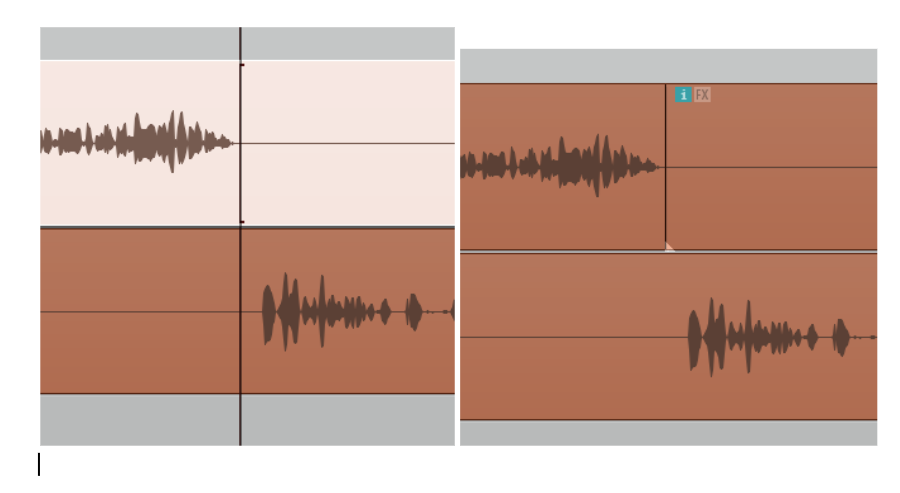
Now let’s check out how judicious use of the S key and a lot of clicking and dragging can remedy this situation.

And like that, we can finally start to edit! Well, maybe not yet. We don’t want to risk losing our work, do we?
1.5 Saving a Project File
While saving a project file doesn’t seem like something that should require a list of instructions, there are a couple of settings and project-naming etiquette to be aware of.
Select “Save project as…” from the File menu or type Ctrl+Shift+S. The following window will pop up.
Select “Save project as…” from the File menu or type Ctrl+Shift+S. The following window will pop up.