How To Edit a Podcast (Podcast Editing Guide Part 3)
Reaper is configured, key track templates are saved and imported, and the tracks themselves are synchronized. This is the moment you’ve been waiting for: editing a podcast.
Well, more accurately, this is the start of the moment you’ve been waiting for. The truth is that podcast editing, like any other form of editing, is complex, requires both theory and hands-on experience to fully understand, and is as much an art as it is a science. So this SOP will focus on the very basics of editing, covering essential techniques you’ll use in practically every episode you put together.
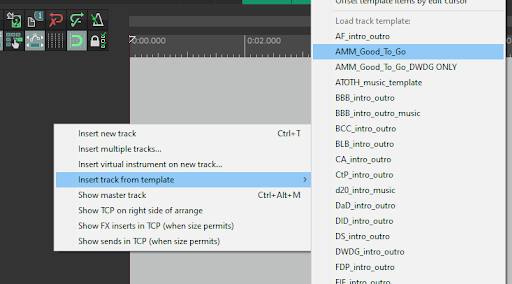
Right off the bat, let’s create a project. Import the AMM track template that you first assembled in Starting a Project in Reaper and drop the interview tracks onto tracks 2 and 3 (remember, track 1 is the AMM track and we don’t want to put any audio on that). naming them both for easy reference.
Well, more accurately, this is the start of the moment you’ve been waiting for. The truth is that podcast editing, like any other form of editing, is complex, requires both theory and hands-on experience to fully understand, and is as much an art as it is a science. So this SOP will focus on the very basics of editing, covering essential techniques you’ll use in practically every episode you put together.
Right off the bat, let’s create a project. Import the AMM track template that you first assembled in Starting a Project in Reaper and drop the interview tracks onto tracks 2 and 3 (remember, track 1 is the AMM track and we don’t want to put any audio on that). naming them both for easy reference.
As well, set playback to 1.0x. Given enough time and practice, you’ll not only be confident editing at 1.5x speed, but you’ll want to edit at that faster rate since it will save you some time, Since you’re just starting out, though, 1.0x is more than fine.
In order, this standard operating procedure covers:
1.1 How to run our volume normalization and dead air removal script on tracks
1.2 The right way (and right occasions) to remove filler words
1.3 Diminishing the intensity of breaths
1.4 Isolating and removing false starts, lip smacks and other obvious issues 1.5 Maintaining room tone
1.1 Volume Normalization and Dead Air Removal
All the way back in Getting Set Up with Reaper, one of the custom actions we had you assemble was a dead air removal script. As you’ll find out very shortly, this script is one of the most essential tools at our disposal, and the three big reasons why that is are coincidentally the three main steps of this process. This useful script:
-Normalizes the volume across all selected tracks so that all speakers have consistent gain levels with respect to each other from start to finish.
-Isolates and removes dead air—moments when nobody is speaking—based on parameters of time and volume.
-Removes these newly created gaps so that you won’t have to stop and adjust all of these separate audio items as you move through the episode.
Lets try this with our audio, shall we?
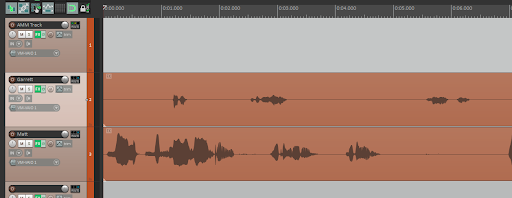
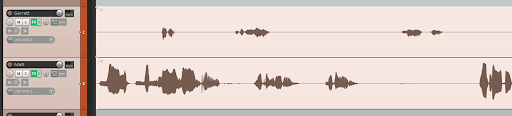
First, highlight both of the tracks by double-clicking on the control panel for Speaker 1's track, then holding down the shift key and double-clicking Speaker 2's control panel. Whenever you need to highlight two or more tracks at once, use this shift-key trick; it works for as many tracks as you have!
-Normalizes the volume across all selected tracks so that all speakers have consistent gain levels with respect to each other from start to finish.
-Isolates and removes dead air—moments when nobody is speaking—based on parameters of time and volume.
-Removes these newly created gaps so that you won’t have to stop and adjust all of these separate audio items as you move through the episode.
Lets try this with our audio, shall we?
First, highlight both of the tracks by double-clicking on the control panel for Speaker 1's track, then holding down the shift key and double-clicking Speaker 2's control panel. Whenever you need to highlight two or more tracks at once, use this shift-key trick; it works for as many tracks as you have!
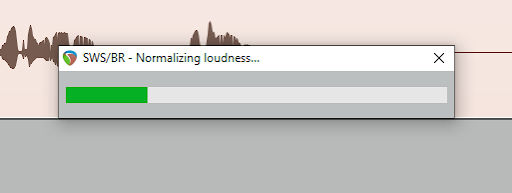
Use the Shift+2 shortcut we designated when previously creating the custom script to initiate the dead air isolation and removal process. You’ll see a progress bar gradually fill up as Reaper analyzes and balances the levels on both tracks.
Next, you’ll want to adjust the settings in the Auto trim/split items window that pops up to match what you see in the following screenshot.
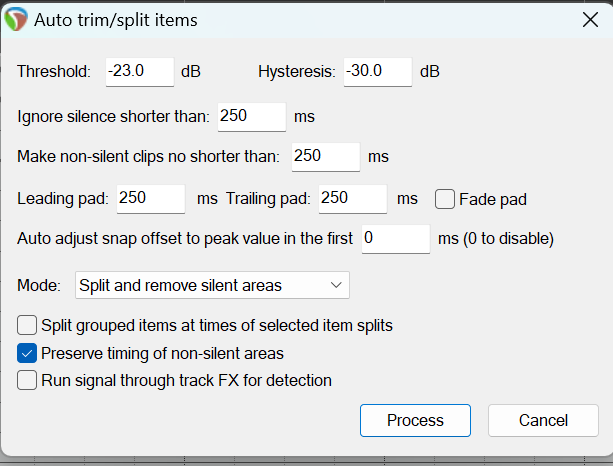
What these settings effectively do is communicate to Reaper “if audio is quieter than X decibels for longer than X milliseconds, remove it.” 250 milliseconds is the standard for the time parameter we set as part of the dead air script, though we will change it depending on the client’s preferred pacing for their podcast. For more low-key, contemplative shows like we set those first four milliseconds parameters to 350.
Be sure that “Preserve timing of non-silent areas” is checked, then click “Process” to continue slicing and dicing that dead air. This can take anywhere from a few seconds to a couple minutes depending on the length and quantity of tracks selected.
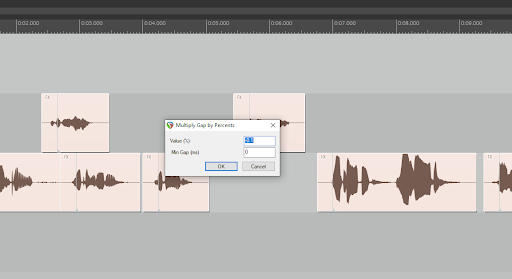
Once the script has finished its automated audio surgery, ensure that the settings for the Multiply Gap by Percents window are set to those in the screenshot below ( -0.1% and 0) and click “OK”. This removes all of the gaps created in the wake of the excised dead air.
Be sure that “Preserve timing of non-silent areas” is checked, then click “Process” to continue slicing and dicing that dead air. This can take anywhere from a few seconds to a couple minutes depending on the length and quantity of tracks selected.
Once the script has finished its automated audio surgery, ensure that the settings for the Multiply Gap by Percents window are set to those in the screenshot below ( -0.1% and 0) and click “OK”. This removes all of the gaps created in the wake of the excised dead air.
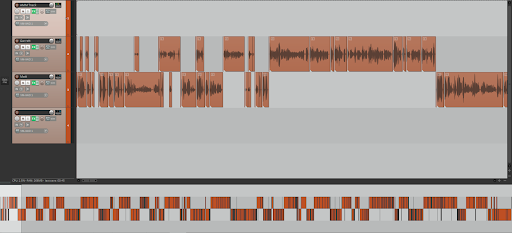
Now zoom out and look at how much of this episode you’ve already edited, and with just a few keystrokes at that! You probably understand why this script has been such a time-saver for us, and why it’s the first edit we make after importing and synchronizing tracks.
Please note that this script isn’t perfect. Going through the episode, you’ll notice that on occasion, there will be partial breaths left over in and around these automated edits. Keep a close ear on these segments and adjust accordingly, either by cutting out the remaining breath or even restoring it entirely, depending on the surrounding context.
With that first important step out of the way, let’s explore one of the most common manual edits you’ll make for any podcast.
With that first important step out of the way, let’s explore one of the most common manual edits you’ll make for any podcast.
1.2 The What, When, How and Why of Removing Filler Words
Since the above script is kind enough to take care of dead air for us, the most frequent edit you’ll make in basically any podcast is cutting filler words. Be it “uh,” “um,” “like,” “you know” or some other utterance, filler words are our brain’s unconscious way of communicating to others that we’re not finished speaking but still need a little time to put the next sentence fragment together. They’re a completely natural part of speech that all people are prone to, unless they’re trained speakers and/or reading off a script.
That being said, excessive filler word usage is noticeable even to casual podcast listeners who aren’t knowledgeable of linguistics or professional speaking, so we strive to remove as many as is reasonable—emphasis on “reasonable” since, as you’ll learn throughout this section, there are plenty of filler words we should actually leave untouched.
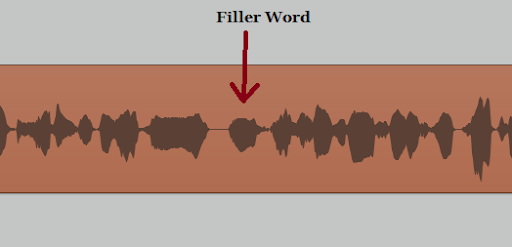
When do we remove filler words? In general, we should aim to cut any filler word that is isolated, spoken immediately before a phrase, and/or uttered immediately after a phrase. Typically, isolated and easy-to-cut filler words have their own distinct waveforms on the track.
That being said, excessive filler word usage is noticeable even to casual podcast listeners who aren’t knowledgeable of linguistics or professional speaking, so we strive to remove as many as is reasonable—emphasis on “reasonable” since, as you’ll learn throughout this section, there are plenty of filler words we should actually leave untouched.
When do we remove filler words? In general, we should aim to cut any filler word that is isolated, spoken immediately before a phrase, and/or uttered immediately after a phrase. Typically, isolated and easy-to-cut filler words have their own distinct waveforms on the track.
We should leave filler words as we’ve found them if they’re spoken quickly in the middle of a phrase. These filler words will usually be part of the surrounding waveform, and ripple-editing them out can cause jarring shifts in tone and pacing that even complete lay people will notice more than the filler words themselves.
On that note, filler words spoken immediately before or immediately after a phrase may be so quick and loud that cutting them will have a similarly disruptive effect, so on many occasions, you’ll end up cutting a filler word, listening to the section again, realizing it sounds odd without its presence, and then undoing and reinstating the filler word. In time, you’ll realize how much your own judgment factors into editing podcasts.
How do we remove filler words? This is where your custom ripple edit comes in handy. Once you come across a filler word, right-click and drag to highlight it. You’ll want to cover just the filler word’s waveform, no more and certainly no less.
How do we remove filler words? This is where your custom ripple edit comes in handy. Once you come across a filler word, right-click and drag to highlight it. You’ll want to cover just the filler word’s waveform, no more and certainly no less.
Then, type X to snip out the filler word using your custom ripple edit. The two resulting audio items will be stitched together with a smooth, subtle crossfade.

From there, listen to the segment again. If you detect even a little bit of the filler word still left over, or if there’s now a little too much space in front of the start of the phrase, highlight the new crossfade with a right-click and drag and ripple edit with X again.
No matter how you cut the filler word, make sure that the resulting cut has a crossfade—either the one created automatically by the custom ripple edit action, or one made manually—so that the resulting splice is seamless.
Why do we remove filler words? As mentioned at the beginning of this section, filler words are people’s natural way of stalling for time while speaking. So while their presence in everyday conversation is fine, we’re preparing these discussions for mass broadcast while trying to keep them at a reasonable length (half an hour to an hour on average), which means that stalling for time is neither necessary nor ideal. With proper trimming, even a first-time podcast guest can sound confident and experienced.
Whether you’re new to editing, new to podcasting, or both, it’s likely you’ll be especially sensitive to hearing filler words while performing your first pass of an episode. Like filler words themselves, that sensitivity is only natural: they’re not something you typically consider until you hear several uttered in the span of a minute on a recording. Consequently, clients and editors alike may want to terminate all filler words with extreme prejudice, but once again, these brief stalls are perfectly normal parts of speech, and removing too many can have the exact opposite of our intended effect.
Remember that the best editing is that which you don’t even notice at all. If you’re noticing sudden, jarring shifts in the cadence of someone speaking because you excised a filler word spoken very quickly mid-phrase, then you’re perhaps being overly judicious with your edit. Don’t try to “fix” the way a person speaks. Instead, work to streamline them.
1.3 The Rules of Debreathing
As with filler words, everybody breathes (we should hope so, or else we need to seriously reconsider several essential truths about human biology). And much like filler words, that breathing can become very noticeable in the span of a single podcast episode, depending on its loudness and frequency. We have both automated and manual tools at our disposal to handle these inhalations and exhalations.
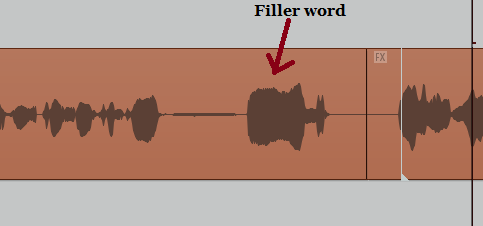
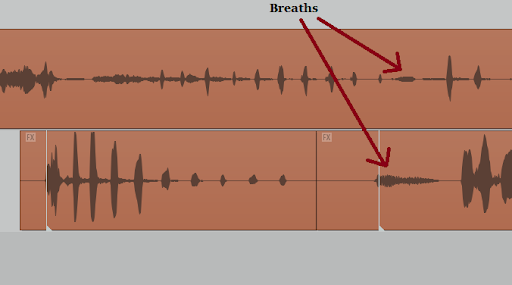
Before we delve into these tools, familiarize yourself with how breaths appear on a waveform.
Before we delve into these tools, familiarize yourself with how breaths appear on a waveform.

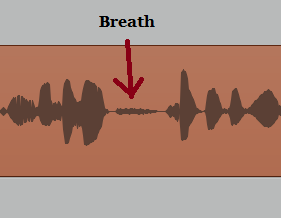
Obviously, it’s easy enough to notice these breaths when you just play through the episode and listen to them, however in time you’ll find it very beneficial to be able to identify certain sounds like breaths and filler words through their positions and waveforms. In general, breath waveforms are quieter (and consequently flatter) than the surrounding words, becoming thicker the louder the breath is; this latter point is important when you’re determining which to manually debreath and which to leave as is.
So, how do we debreath? Glad you asked!
Our automated, set-it-and-forget-it tool for handling breaths is one you already set up back in Section 2 of Starting a Project in Reaper: the Voice Leveler plugin you applied to the AMM track template. Double-check that its settings are adjusted to what you see below and then leave it to do its work as you edit. Just with Voice Leveler alone, a great many intrusive breaths are softened.

If a breath still sounds loud and distracting even while on an AMM track, it’s best to debreath manually. Simply right-click and highlight the breath, then initiate the “Breath Less” action (shortcut A by default).
This action instantly brings down the volume on the highlighted area to -10dB, ideal for most loud breaths. Debreathing also comes in handy in a pinch if there’s a plosive (think the sharp-sounding ‘p’ at the start of “plump” or ‘b’ at the beginning of “black”) or brief bit of background noise that our processing didn’t catch.
As with filler words, you won’t want to debreath all audible breaths, instead reserving this action for harsh breathing, nose sniffing and breaths that sound “wet.” Some breaths, like inhalations immediately after a laugh, are perfectly fine to leave as is—if anything, debreathing can be much more noticeable to the ear than the breath in its natural state.
As with filler words, you won’t want to debreath all audible breaths, instead reserving this action for harsh breathing, nose sniffing and breaths that sound “wet.” Some breaths, like inhalations immediately after a laugh, are perfectly fine to leave as is—if anything, debreathing can be much more noticeable to the ear than the breath in its natural state.
Between Voice Leveler and the dead air script, we end up needing to manually debreath, far, far less frequently than we did before these tools came into our possession, but it’s always good to have your A key at the ready.
1.4 Removing False Starts, Lip Smacks and Obvious Errors
This section highlights other common edits you’ll make in the course of most podcast episodes.
False starts - Any time someone begins a sentence, pauses, rephrases what they’ve just said or says something else entirely, their initial utterance is what we consider to be a “false start.” Like filler words, these are natural parts of speech, but we prefer to cut them for the sake of flow and brevity.
Lip smacks - Some folks are prone to instinctively and unconsciously smacking their lips before beginning a phrase, even hyper-competent hackers. Depending on how loud and noticeable these involuntary sounds are, you’ll either want to ripple edit them out or at least manually debreath them.
Coughing/sneezing/sniffling - No one ever wants to cough, sneeze or sniffle, and no one really wants to hear themselves making those sounds on a recording, so we are judicious in cutting these (or at least debreathing them in the case of sniffles).
Affirmations - These are any instance of someone saying “yeah,” “uh-huh,” “right,” or “mhmm” as someone else is talking. In regular, non-recorded conversation, these affirmations are perfectly normal and if anything are a sign of active listening; in a podcast, they can be very distracting to the listener. Make a point of removing most affirmations as you edit. It’s okay to leave in one every so often, especially when it’s in response to something the other speaker has said, but otherwise you can do away with them by right-clicking and highlighting and then using Always Delete with Z.
(the obvious exception to this being interviews recorded on a single mono track, as there’s no way to isolate one person’s audio while the other is speaking)
Lastly, keep an ear out for obvious errors: a speaker stating an incorrect fact and then correcting themselves, unexpected audio glitches/pops, or the vibration of a cell phone during an interview. The more you edit, the more you’ll notice these and get in good practice using the ripple edit.
1.5 Maintaining Consistent Room Tone and Noise Floor
So far the focus of our edits have been loud in some way—audible breaths, noticeable filler words, lip smacks, etc.—but thorough podcast editing means paying attention to the quieter parts as well.
When editing, we want to be mindful of each speaker’s room tone, which is to say the natural background noise of their recording setting. Room tone varies from one setting to another, and can be mitigated/balanced somewhat by our audio processing and noise reduction plugins, but unless a podcaster is recording in an anechoic chamber, there’s always going to be some kind of background hum or echo. Related to room tone is the concept of a recording’s noise floor, the measurement of all the base noise given off by an environment and recording device—microphones and other recording equipment emit their own noise!—before the intended signal (people speaking) ever enters the mix.
In any podcast we edit, we want to control the room tone and noise floor from start to finish so that the episode’s sound profile is consistent and professional. This means we should avoid any gaps in the Reaper project file. At every point in a podcast episode, from the very beginning to the very end, there needs to be some form of audio on at least one of the tracks, whether it’s people speaking, background noise, or music.
This can be tricky when there’s seemingly no way around a gap. Consider the following example:
When editing, we want to be mindful of each speaker’s room tone, which is to say the natural background noise of their recording setting. Room tone varies from one setting to another, and can be mitigated/balanced somewhat by our audio processing and noise reduction plugins, but unless a podcaster is recording in an anechoic chamber, there’s always going to be some kind of background hum or echo. Related to room tone is the concept of a recording’s noise floor, the measurement of all the base noise given off by an environment and recording device—microphones and other recording equipment emit their own noise!—before the intended signal (people speaking) ever enters the mix.
In any podcast we edit, we want to control the room tone and noise floor from start to finish so that the episode’s sound profile is consistent and professional. This means we should avoid any gaps in the Reaper project file. At every point in a podcast episode, from the very beginning to the very end, there needs to be some form of audio on at least one of the tracks, whether it’s people speaking, background noise, or music.
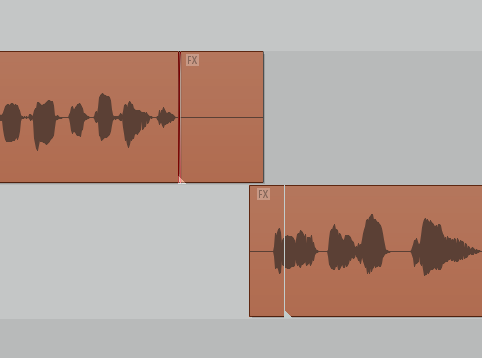
This can be tricky when there’s seemingly no way around a gap. Consider the following example:

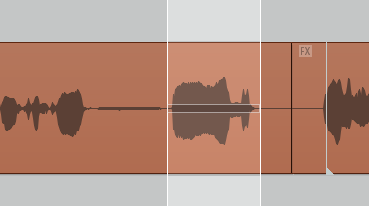
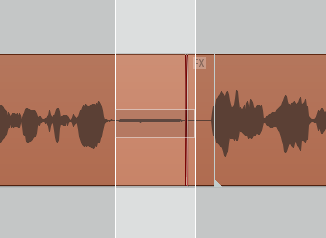
Right here we have Speaker 1's track on top and Speaker 2’s on the bottom. At the end of Speaker 1’s audio item, he finishes his idea, breathes, and starts a new phrase, only for Speaker 2 to start speaking. At first glance, this isn’t too difficult: just cut Speaker 1's last breath and first word of his new phrase.
Oh no, we really don’t want this. If you want to know why, let’s check out how this section of audio looks in spectrogram form:
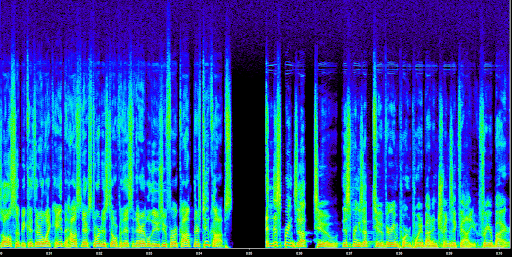
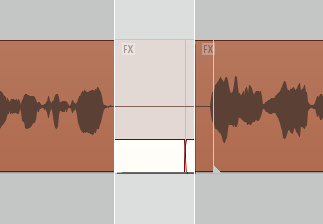
Yikes, that’s a pretty noticeable gap in the noise floor! This means the episode has an inconsistent sound profile and doesn’t meet Podigy’s standard of quality. Let’s hit Ctrl+Z to undo that deletion and find a better solution, shall we?
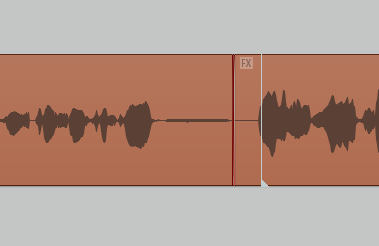
Instead of cutting anything else, grab the right edge of Speaker 1's last audio item in this section and drag it to the right so that it covers the gap.
Instead of cutting anything else, grab the right edge of Speaker 1's last audio item in this section and drag it to the right so that it covers the gap.
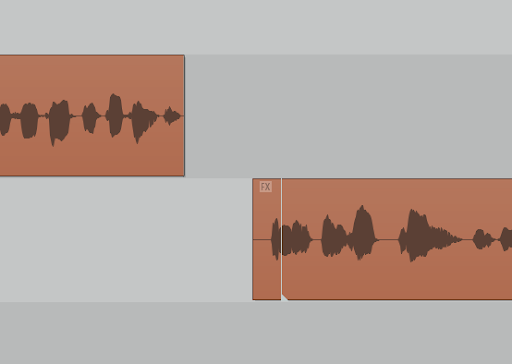
This way, not only do we have a perfectly timed pause, but the episode’s room tone and noise floor is maintained.
At many points in your editing career, it will be necessary to leave some kind of gap when making a cut. Just be sure to patch it up by grabbing a segment of relative silence from somewhere else on that person’s track. Whether you’re waiting for the train in a subway station or cutting audio, you always want to be sure to mind the gap!
At many points in your editing career, it will be necessary to leave some kind of gap when making a cut. Just be sure to patch it up by grabbing a segment of relative silence from somewhere else on that person’s track. Whether you’re waiting for the train in a subway station or cutting audio, you always want to be sure to mind the gap!
1.6 Wrapping Up
As we mentioned at the very beginning of this SOP, learning how to edit podcasts requires both theoretical understanding as well as hands-on experience, so what may be daunting here on the page will become more clear as you start to edit podcasts.