Setting Up Reaper For Podcast Editing (Podcast Editing Guide Part 1)
Podcast editing requires a reliable digital audio workstation (DAW), and Reaper is Podigy’s DAW of choice. Created by Cockos Inc., Reaper may look daunting at first glance, but it’s proven to be a remarkably stable and customizable platform, and even after working with it for several years we’re still surprised by how flexible a workstation it can be. Since installing and configuring Reaper requires several steps and a little technical know-how, we’ve assembled this guide to get you up and editing ASAP.
In order, this standard operating procedure will cover:
-Downloading and installing Reaper
-Acquiring a license, which gives you access to Reaper in perpetuity
-Initial configuration to make Reaper easier to navigate and use
-Installing SWS and ReaPack extensions that expand Reaper’s customizability
-Setting up custom actions and scripts that will greatly simplify your work
1. Downloading and Installing Reaper
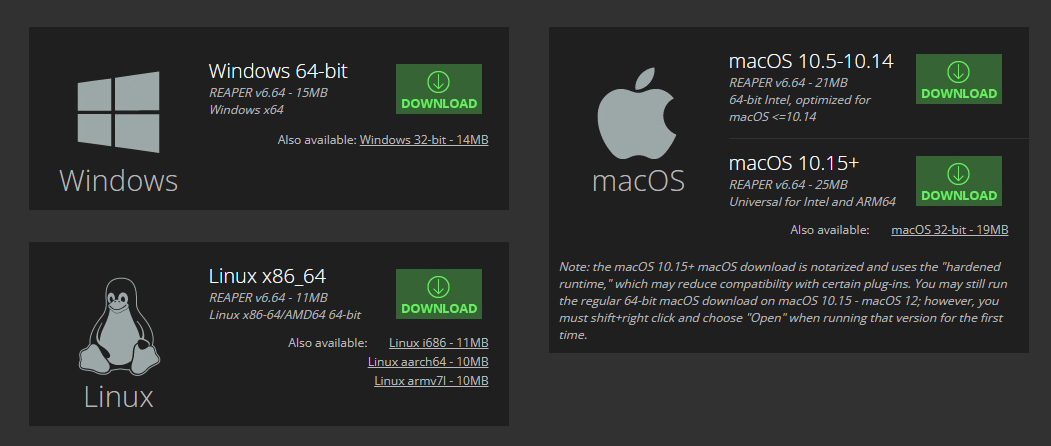
First up, you’ll want to navigate to Reaper’s download page and select the platform of your choice. Regardless of what kind of computer you’re working on, there’s a version for it.
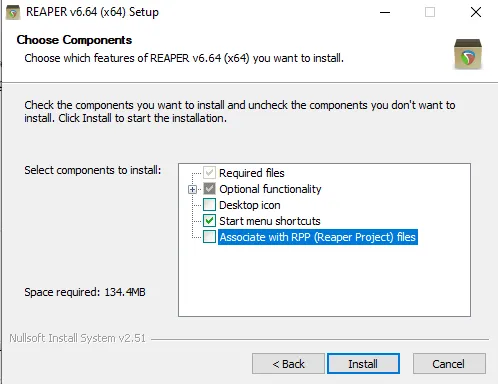
Double-click the installation executable that’s been dropped into your Downloads folder and proceed through the setup process step by step. Make sure that Reaper installs to your default drive (C:\ on a PC), that the portable install checkbox is left blank, and that under the Choose Components panel you’ve selected “Associate with RPP (Reaper Project) files”—you’ll become very familiar with the .RPP file extension over time, so it’s wise to make Reaper the default program for it.
1.2 Acquiring a License
Reaper comes with a 60-day free trial that gives you access to all of the platform’s functions. Once that period is up, you’ll need to purchase a license for $60 USD, though you’ll be happy to know it’s a one-time payment. The license comes in the form of an alphanumeric key, which you can copy and paste from the email into the license tab under Help -> About REAPER from the menu bar at the top of the screen. Be sure to favorite/star the email containing the license key and download the attached file to your documents folder so you have it on hand in case you ever install Reaper on a new machine.
1.3 Initial Configuration
Once Reaper is installed and licensed, we’re going to go about configuring the workstation so that it’s a little easier to navigate. This section involves hopping from one menu to another and making a bunch of small yet vital adjustments, and once you have it set up you’ll never have to worry about them again.
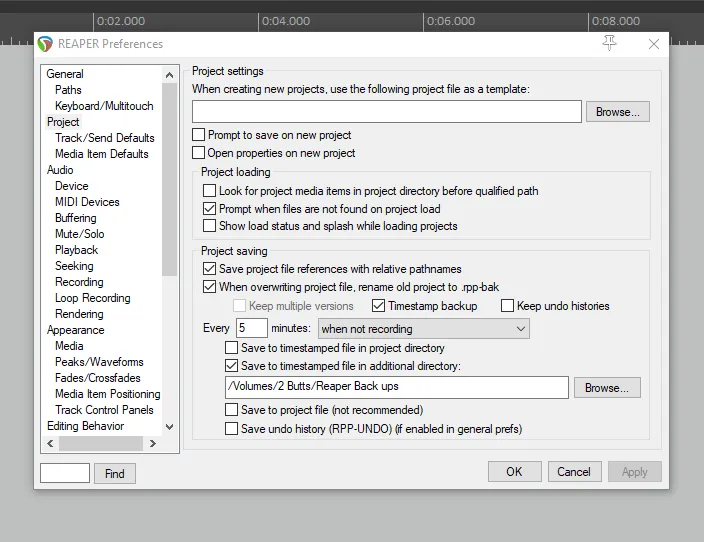
Our first adjustment is setting up Reaper’s autosave function, which you can access from Options -> Preferences, and then by selecting the Projects item from the list on the left. From here, tick the “Timestamp backup” checkbox, specify an autosave interval (5 or 10 minutes is best), check off “Save to timestamped file in additional directory” and ensure it’s saving to a directory with plenty of space in the field below. Hit “Apply” or “OK” at the bottom to finalize. Now, a “Reaper Back ups” subfolder will be created in every Reaper project file you save, and in case of a crash you can simply navigate to this subdirectory and double-click the most recent file to resume your project with only a few minutes of work lost.
Our first adjustment is setting up Reaper’s autosave function, which you can access from Options -> Preferences, and then by selecting the Projects item from the list on the left. From here, tick the “Timestamp backup” checkbox, specify an autosave interval (5 or 10 minutes is best), check off “Save to timestamped file in additional directory” and ensure it’s saving to a directory with plenty of space in the field below. Hit “Apply” or “OK” at the bottom to finalize. Now, a “Reaper Back ups” subfolder will be created in every Reaper project file you save, and in case of a crash you can simply navigate to this subdirectory and double-click the most recent file to resume your project with only a few minutes of work lost.
As mentioned previously, Reaper is a very stable platform, but the occasional crash, sudden computer shutoff and/or power outage can still occur, so this little configuration will save you a lot of headaches in the future.
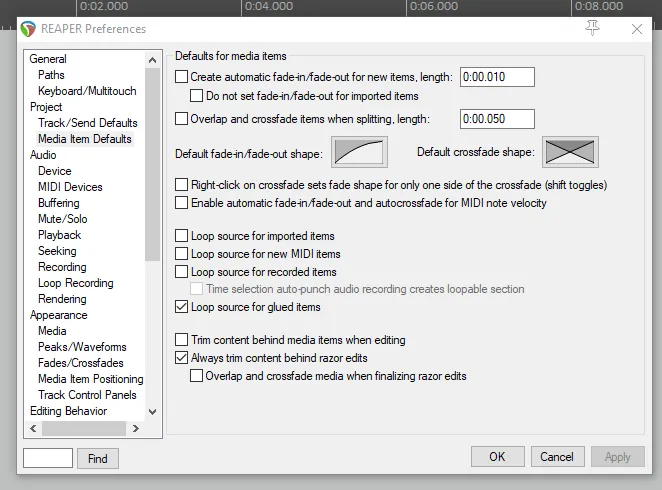
Afterward, select the Media Item Defaults menu under this very same Project tab. This panel sets up crossfades, which are very important to the edits we make and keep them sounding smooth and seamless rather than abrupt, but Reaper’s default approach to these crossfades isn’t ideal for our podcasting purposes. What we want to do here is ensure that both “Create automatic fade-in/fade-out for new items, length” and “Overlap and crossfade items when splitting, length” are left unchecked, but that the adjacent fields are set to 0:00:010 and 0:00:050, respectively. This way, we turn off Reaper’s default crossfades while setting up timecode parameters that the SWS extension will later pull from. If it seems overly technical now, you’ll understand more once we go about installing SWS and setting up custom actions in the following sections. Click “Apply” or “OK” to approve the changes.
Afterward, select the Media Item Defaults menu under this very same Project tab. This panel sets up crossfades, which are very important to the edits we make and keep them sounding smooth and seamless rather than abrupt, but Reaper’s default approach to these crossfades isn’t ideal for our podcasting purposes. What we want to do here is ensure that both “Create automatic fade-in/fade-out for new items, length” and “Overlap and crossfade items when splitting, length” are left unchecked, but that the adjacent fields are set to 0:00:010 and 0:00:050, respectively. This way, we turn off Reaper’s default crossfades while setting up timecode parameters that the SWS extension will later pull from. If it seems overly technical now, you’ll understand more once we go about installing SWS and setting up custom actions in the following sections. Click “Apply” or “OK” to approve the changes.
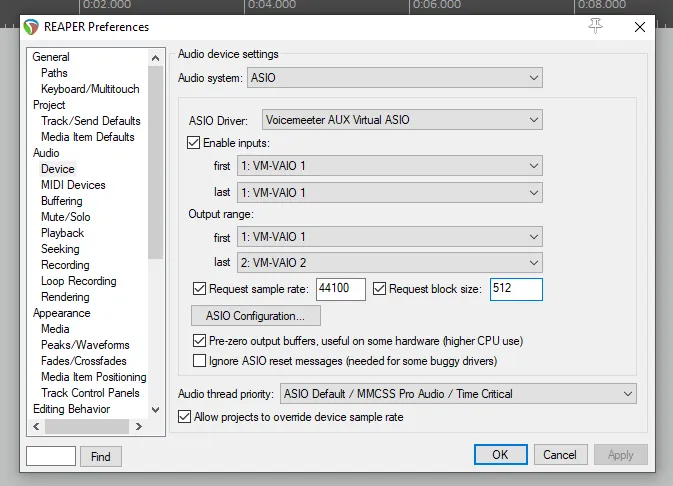
Let’s skip down the menu on the left to Audio -> Device and confirm that “Request sample rate” is set to 44100. The reason we’re setting it to 44100 specifically has to do with digital audio/signal processing theory but why this is useful and practical to a new podcast editor such as yourself is that it will help prevent odd issues like tracks slowly desynchronizing or voices sounding lower-pitched than they’re supposed to be. Next to it is “Request block size”, a setting that determines how frequently Reaper updates the audio, as well as its latency. The smaller the block size, the less latency you’ll have, though this can be taxing on your CPU and may result in audio drop-outs. For our editing purposes, let us set it to 512 and click “Apply.”
Before we leave the Preferences menu, we’ll want to set up our mouse behaviors so that we can simply right-click and drag to select what we want to edit out. To that end, scroll down the menu on the left to Editing Behavior -> Mouse Modifiers and select “Arrange view” from the drop-down “Context” menu and then “right drag” from the drop-down next to it. You’ll want to double-click on the “Default action” modifier in the list below and and select “Marquee select items” -> “Set time selection”. Click “OK” or “Apply” to finalize the change.

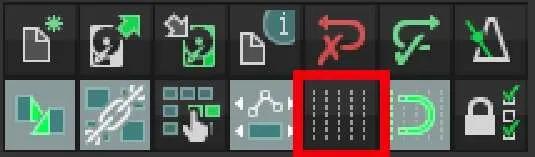
There’s one final adjustment that you can implement with just a single click: navigate to the main editing toolbar in the upper left-hand corner and make sure that the grid lines in the editing pane are turned off (you can also use ALT+G to toggle on PC). These grid lines come in handy when editing music, but when editing podcasts we’ll want them switched off to allow ourselves a little more fine-tuning when dragging around and adjusting audio items. Otherwise, those items may “snap” to the nearest grid line. You’ll know the grid lines are properly turned off when the button is black instead of light grey and the faint vertical lines are no longer visible in the editing pane.
Goodness, that was a lot of settings to navigate, but the long-term upside is you’ve made Reaper a little easier to use with some adjustments that you have set and can now forget—though if for some reason they’re ever altered due to an update or mistake, you can check back here for reference!
1.4 Installing SWS and ReaPack Extensions
With initial configuration out of the way, we’re going to download and install some additional tools that enhance Reaper’s capabilities.
While Reaper has plenty of functionality just on its own, the SWS extension pack allows us to bend the DAW even further to our own uses, namely by enabling us to chain together custom actions that reduce a handful of separate clicks and button presses to a single keystroke. When you’re making dozens and even hundreds of edits per episode, these custom actions end up saving you a lot of time. Download SWS from its website, making sure to select your platform of choice, and follow the installation guide.
Reaper also has a wide variety of custom packages that we’ll want to have quick and easy access to if we’re going to make efficient use of them. ReaPack is a package manager that keeps all of Reaper’s myriad resources neatly organized and updated. Grab the version for your preferred platform on its website and install, then navigate to Actions -> Show Reaper resource path in explorer/finder. Drop the .DLL file you just downloaded into the UserPlugins subdirectory, then return to Reaper and select Extensions -> ReaPack -> Synchronize Packages. Grab a snack and sit back for the next little while as Reaper then synchronizes and installs hundreds of the appropriate resources and libraries.
You'll also want to grap XRaym's custom action (~$20), Multiply Selected Items inbetween all tracks gaps by X percents. Instructions for install are provided on purchase.
It may not be immediately apparent why we’ve installed these extensions and libraries, but you’ll quickly understand their purpose once we create some custom editing actions.
1.5 Setting Up Custom Actions and Scripts
Now that we have access to the above extensions, we can really start to make use of them by chaining together custom actions that will make every single cut and edit a breeze to execute.
To edit efficiently, we want an action that 1. removes a section of highlighted audio across all tracks at once, 2. automatically moves up the following audio to where the cut is made so we don’t have to manually drag the items every time and 3. is capable of doing all this in a single keystroke. It sounds like a tall order, but the custom action list and the SWS extensions you previously installed make this so, so easy.
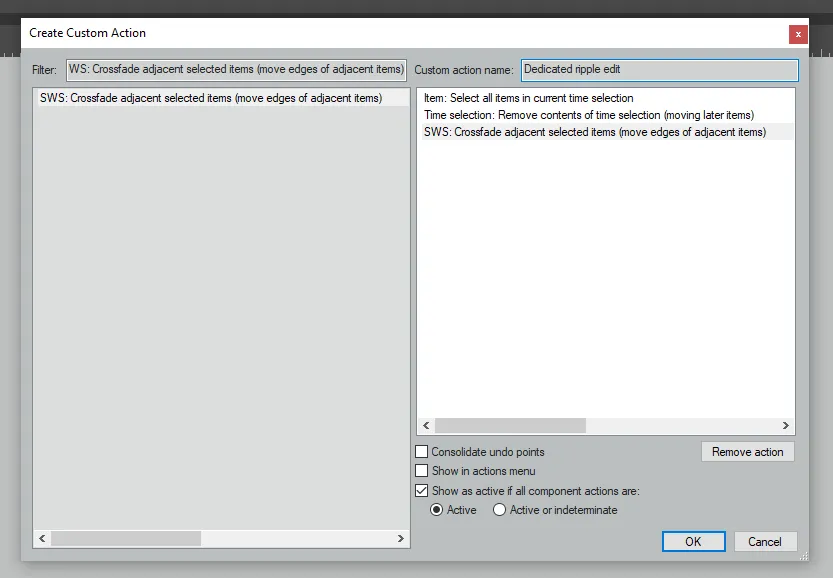
You’ll first want to navigate to the “Show action list” item under Actions in the menu bar, and from the “New action…” button then select “New custom action.” In the “Create Custom Action” window that appears, begin typing “Item: Select all items in current time selection.” Double click on the item when it appears in the window below, and it will copy itself into the pane on the right hand side. Repeat this process with “Time selection: Remove contents of time selection (moving later items)” and “SWS: Crossfade adjacent selected items (move edges of adjacent items)”, in that specific order. Remember how we specified crossfade timecodes during initial configuration? That technical step has now come quite in handy for this action. Once all three actions are listed in the right-hand pane, name it whatever you choose in the “Custom action name” field above—we typically use “Dedicated ripple edit”—and click OK. With just a few steps, you’ve created a custom action that will save you an innumerable amount of time while editing.
To edit efficiently, we want an action that 1. removes a section of highlighted audio across all tracks at once, 2. automatically moves up the following audio to where the cut is made so we don’t have to manually drag the items every time and 3. is capable of doing all this in a single keystroke. It sounds like a tall order, but the custom action list and the SWS extensions you previously installed make this so, so easy.
You’ll first want to navigate to the “Show action list” item under Actions in the menu bar, and from the “New action…” button then select “New custom action.” In the “Create Custom Action” window that appears, begin typing “Item: Select all items in current time selection.” Double click on the item when it appears in the window below, and it will copy itself into the pane on the right hand side. Repeat this process with “Time selection: Remove contents of time selection (moving later items)” and “SWS: Crossfade adjacent selected items (move edges of adjacent items)”, in that specific order. Remember how we specified crossfade timecodes during initial configuration? That technical step has now come quite in handy for this action. Once all three actions are listed in the right-hand pane, name it whatever you choose in the “Custom action name” field above—we typically use “Dedicated ripple edit”—and click OK. With just a few steps, you’ve created a custom action that will save you an innumerable amount of time while editing.
We also want to be able to delete a section of any highlighted track without affecting other, non-selected tracks in the same region or automatically moving forward the audio that follows it—say if we’re cutting out someone coughing while another person is speaking. Return to the “Create Custom Action” window, then search for and add “Set ripple editing off” and “Edit: Cut items/tracks/envelope points (depending on focus) within time selection, if any (smart cut)” in that order. Name it something along the lines of “Always Delete” and finalize with the OK button.
Third, we’re going to assemble a custom action that will save you more time than any other. In order, the actions to chain are 1. “SWS/BR: Normalize loudness of selected items to -23 LUFS”, 2. “Item: Auto trim/split items (remove silence)…”, 3. “Script: X-Raym_Multiply selected items in between all tracks gaps by X percents.lua” and 4. “Item: Crossfade any overlapping items”. Name this “Dead air script” for easy reference.
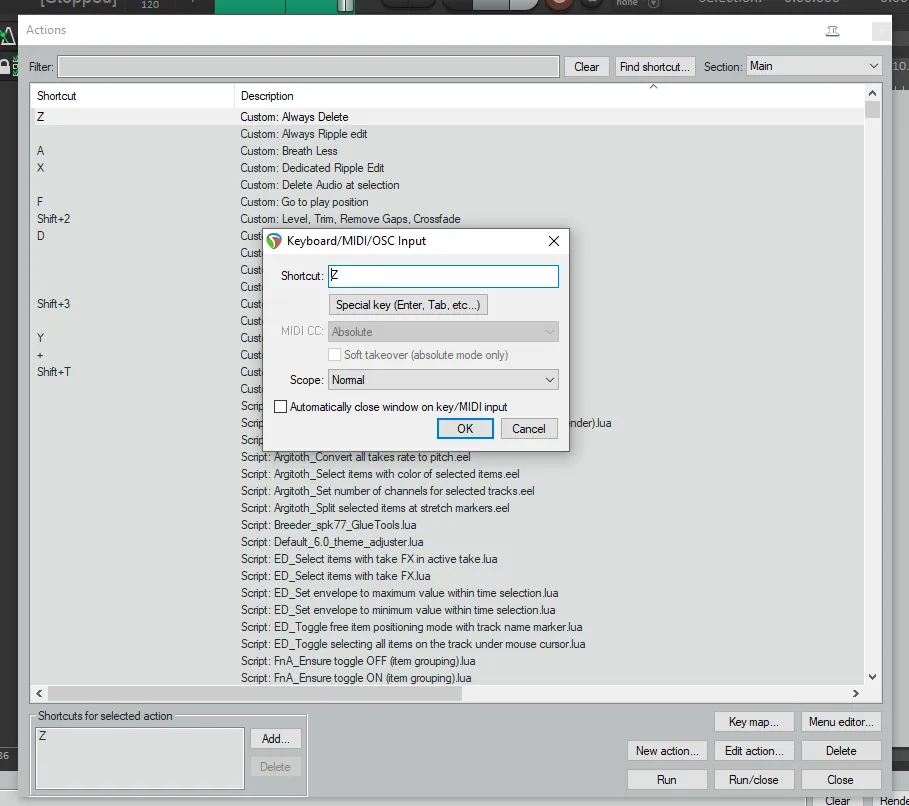
With these custom actions set up, we’ll want to assign keyboard shortcuts to them, which can be done in the main Action List window. Select the custom action from the list (use the search field up top if it isn’t immediately visible), click “Add…” next to the “Shortcuts for selected action” pane, type in the keyboard shortcut of choice, and click “OK.” We tend to go with X for the dedicated ripple edit, Z for the always delete function and Shift+2 for the dead air script, but feel free to choose which shortcuts feel most comfortable for you. Just be mindful if your key selection is already assigned to a different action in the list!
Third, we’re going to assemble a custom action that will save you more time than any other. In order, the actions to chain are 1. “SWS/BR: Normalize loudness of selected items to -23 LUFS”, 2. “Item: Auto trim/split items (remove silence)…”, 3. “Script: X-Raym_Multiply selected items in between all tracks gaps by X percents.lua” and 4. “Item: Crossfade any overlapping items”. Name this “Dead air script” for easy reference.
With these custom actions set up, we’ll want to assign keyboard shortcuts to them, which can be done in the main Action List window. Select the custom action from the list (use the search field up top if it isn’t immediately visible), click “Add…” next to the “Shortcuts for selected action” pane, type in the keyboard shortcut of choice, and click “OK.” We tend to go with X for the dedicated ripple edit, Z for the always delete function and Shift+2 for the dead air script, but feel free to choose which shortcuts feel most comfortable for you. Just be mindful if your key selection is already assigned to a different action in the list!
After you’ve completed all of these steps, you now have three, single-keystroke custom actions (well, two keys at once in the dead air script’s case) that will serve as your go-to edit buttons for any podcast you take on. In time, you’ll become more used to the ins and outs of the action list and may end up creating a few of your own!
1.6 Wrapping Up
It’s been a fairly technical, multi-step journey, but by this point Reaper is set up with the vast majority of the tools and tricks you’ll need to edit podcasts with relative ease. In the process, you’re now a little bit familiar with the DAW’s many menus and settings, and you’ll only become more comfortable with the platform moving forward.